Spoiler alert: your customers can be your best source of feedback.
And we don’t just mean over social media, email, or other traditional forms of communication that take place during the customer-business relationship. Rather, we mean dedicated, solicited feedback that provides actionable – that is, practical – results for your subscription business.
Surprisingly, though, the majority of business owners never take the time to gather that feedback. Instead, these entrepreneurs rely on anecdotal comments they receive sporadically throughout the month. While that can feel like you’re gathering feedback from customers, however, you’re going about it in a reactive way. If you’re gathering data only when a customer proactively volunteers their thoughts, your data set is going to be very skewed.
Why? Customers who offer feedback unasked – or impulsively – tend to be either very happy or very unhappy with a service. That kind of feedback is crucial, but it won’t provide you a comprehensive evaluation of your strengths and improvement areas.
No matter what stage your business is in, what level of churn you’re experiencing, or what your niche may be, you ought to be surveying your subscribers every month.
How to Create a Survey for Customers
First, choose a service for creating your survey. There are a handful of solid options, including Wufoo, Survey Monkey, Google Surveys, and Typeform. Personally, we recommend the user experience behind Typeform, which moves the survey taker along in a smooth, more digestible manner than a simple, lengthy form.
Because you might have different taste, however, we’ve gone ahead and created two sample surveys:
- See a sample Typeform survey
- See a sample Wufoo survey
Typeform is free for ≤100 responses a month, then $30/month for unlimited responses. Wufoo, which offers a more basic format, is also free for up to 100 responses, then $14/month for up to 1,000 (and scales from there).
Both surveys serve the same function and ask the same questions. For the purpose of this guide, we’ll show you step-by-step how to create both of these sample surveys.
First, let’s take a look at Typeform.
How to Survey Subscribers with Typeform
First, create an account with Typeform and log in. Once in your Typeform dashboard, click “Create a new typeform.”
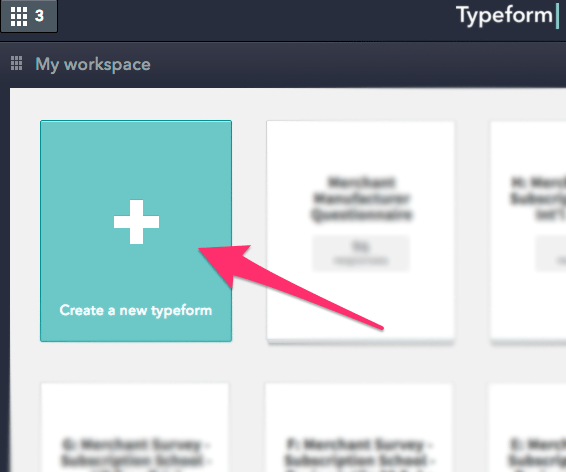
You’ll then be prompted to name your survey. Use a title that will make it easy for you to keep track of your results, like Subscriber Survey – August.
Once you’ve named your survey, you’ll enter the dashboard where you can create a survey.
Below, we’ve highlighted the 4 central prompts we recommend, as well as the “Welcome” and “Thank You” screen options. We suggest using Long Text, Question Group, Yes/No and Rating options. But of course, you can use as many fields as makes sense for you!
To add prompts to your survey, click and drag your preferred option(s) into the drag-and-drop block editor.

Notice the button marked Question Group? You can use this feature to bundle customized sets of questions for specific products. Additionally, this option allows you to feature an Image or Video – to jog your subscriber’s memory, you might upload a picture of each product.
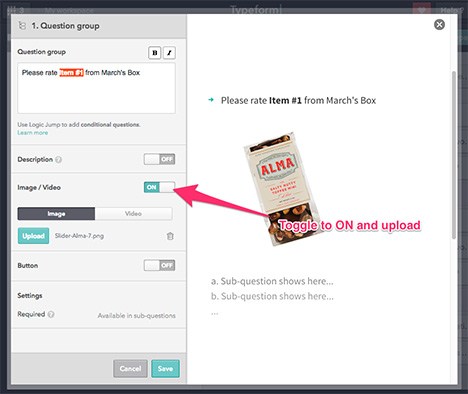
Once you’ve added the Question Group to your survey, drag the Rating and Yes/No options as “sub-questions” within the question group. As you add these, fill in the description to clarify each question’s purpose for your reviewers.
- Set the Rating scale to 5 stars. Caption it with the prompt, “On a scale of 1 to 5 (with 5 being best), how would you rate this item?”
- For the Yes/No option, ask subscribers, “Would you like to see this type of item again?”
- You can also add a Short Text or Long Text option to solicit more qualitative feedback from your subscribers if you like.
Note: Keep in mind that some subscribers may be less willing to fill out a survey if they are required to write a longer product evaluation. We recommend setting the open-ended Short Text or Long Text fields as optional for users.
Ta-da – you’ve completed your first question group! Now, if you like, you can duplicate this set of questions for the other products in your subscription box. Click the Duplicate icon on the top right of the question group’s toolbar (see below) to reuse your questions. Remember to update the product picture/video as needed.
Check it out below. Your survey is taking shape!

After you added question groups for each product you want to survey, create an overall Rating question. Set up this rating as its own question field – not a sub-question in a group you’ve already made. (See #3 in the above screenshot.) Here, you can ask subscribers about their holistic box experience. Below this, you might add another Short Text or Long Text sub-question, prompting subscribers to provide any additional feedback they might want to include.
Preview your Typeform survey to make sure everything looks the way you want. You’re almost there! But there’s one more thing…
If You Include an Incentive, Track Your Responses
As you may have noticed in the screenshot above, you can create incentives for subscribers who complete the survey. To do this, you might offer subscribers a percentage off their next box or a free bonus gift in their next delivery. However, you’ll need to capture (and track) their email addresses within the survey in order to follow up on these incentives.
Take Note: The sample Wufoo survey we’ve made (above) requires the subscriber’s email address before they can submit their answers. We’ll show you how to build this in Wufoo later on.
To add an email prompt in Typeform, it’s a bit more complicated. The first thing you’ll need to do is toggle on the Hidden Fields option at the bottom of the survey:
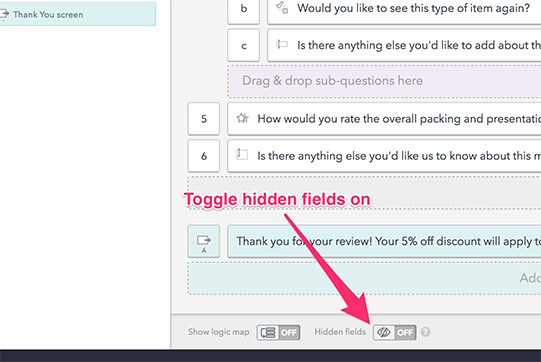
Once you switch that on, you’ll see the following screen. Add the word “email” at the top of the screen, then save.
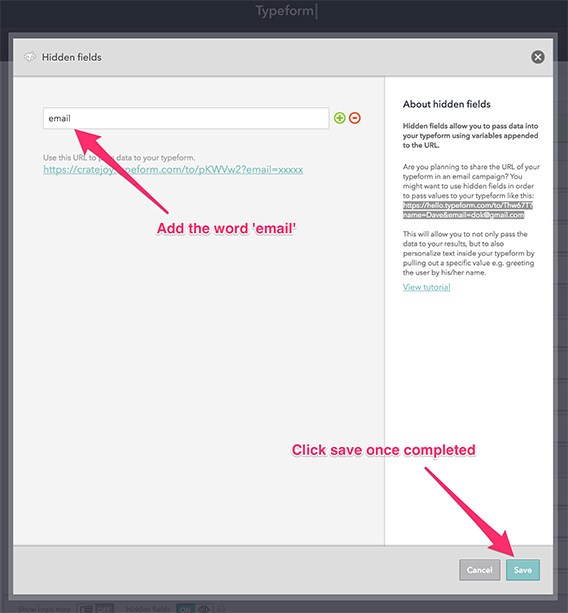
When sending out the survey to subscribers, copy the link Typeform provides you (see above). But – this is important! – replace the XXXXXX at the end of the URL with a merge tag from your email marketing provider.
These tags will be different for each provider, so we’ve included two examples below: one from Intercom and one from MailChimp.
- Intercom: {{ email | fallback:”_REPLACE_THIS_” }}
- MailChimp: *|EMAIL|*
So, when you implement that change, the Typeform link will look something like this:
- Intercom: https://cratejoy.typeform.com/to/pKWVw2?email={{ email | fallback:”_REPLACE_THIS_” }}
- Mailchimp: https://cratejoy.typeform.com/to/pKWVw2?email=*|EMAIL|*
To make this work, you’ll need to send an email requesting that subscribers complete your survey. Then, when subscribers click through to the survey from that email, you’ll capture their email address automatically and view it in your Typeform results.
Remember to use a merge tag from your specific email marketing platform. If you use a client other than Intercom or MailChimp, you’ll need to search for merge tags in their help documentation.
And that’s it – you’ve set up a Typeform with email tracking!
Now, let’s take a look at how Wufoo does it.
How to Survey Subscribers with Wufoo
First thing, click on the “New Form” button in the top right.

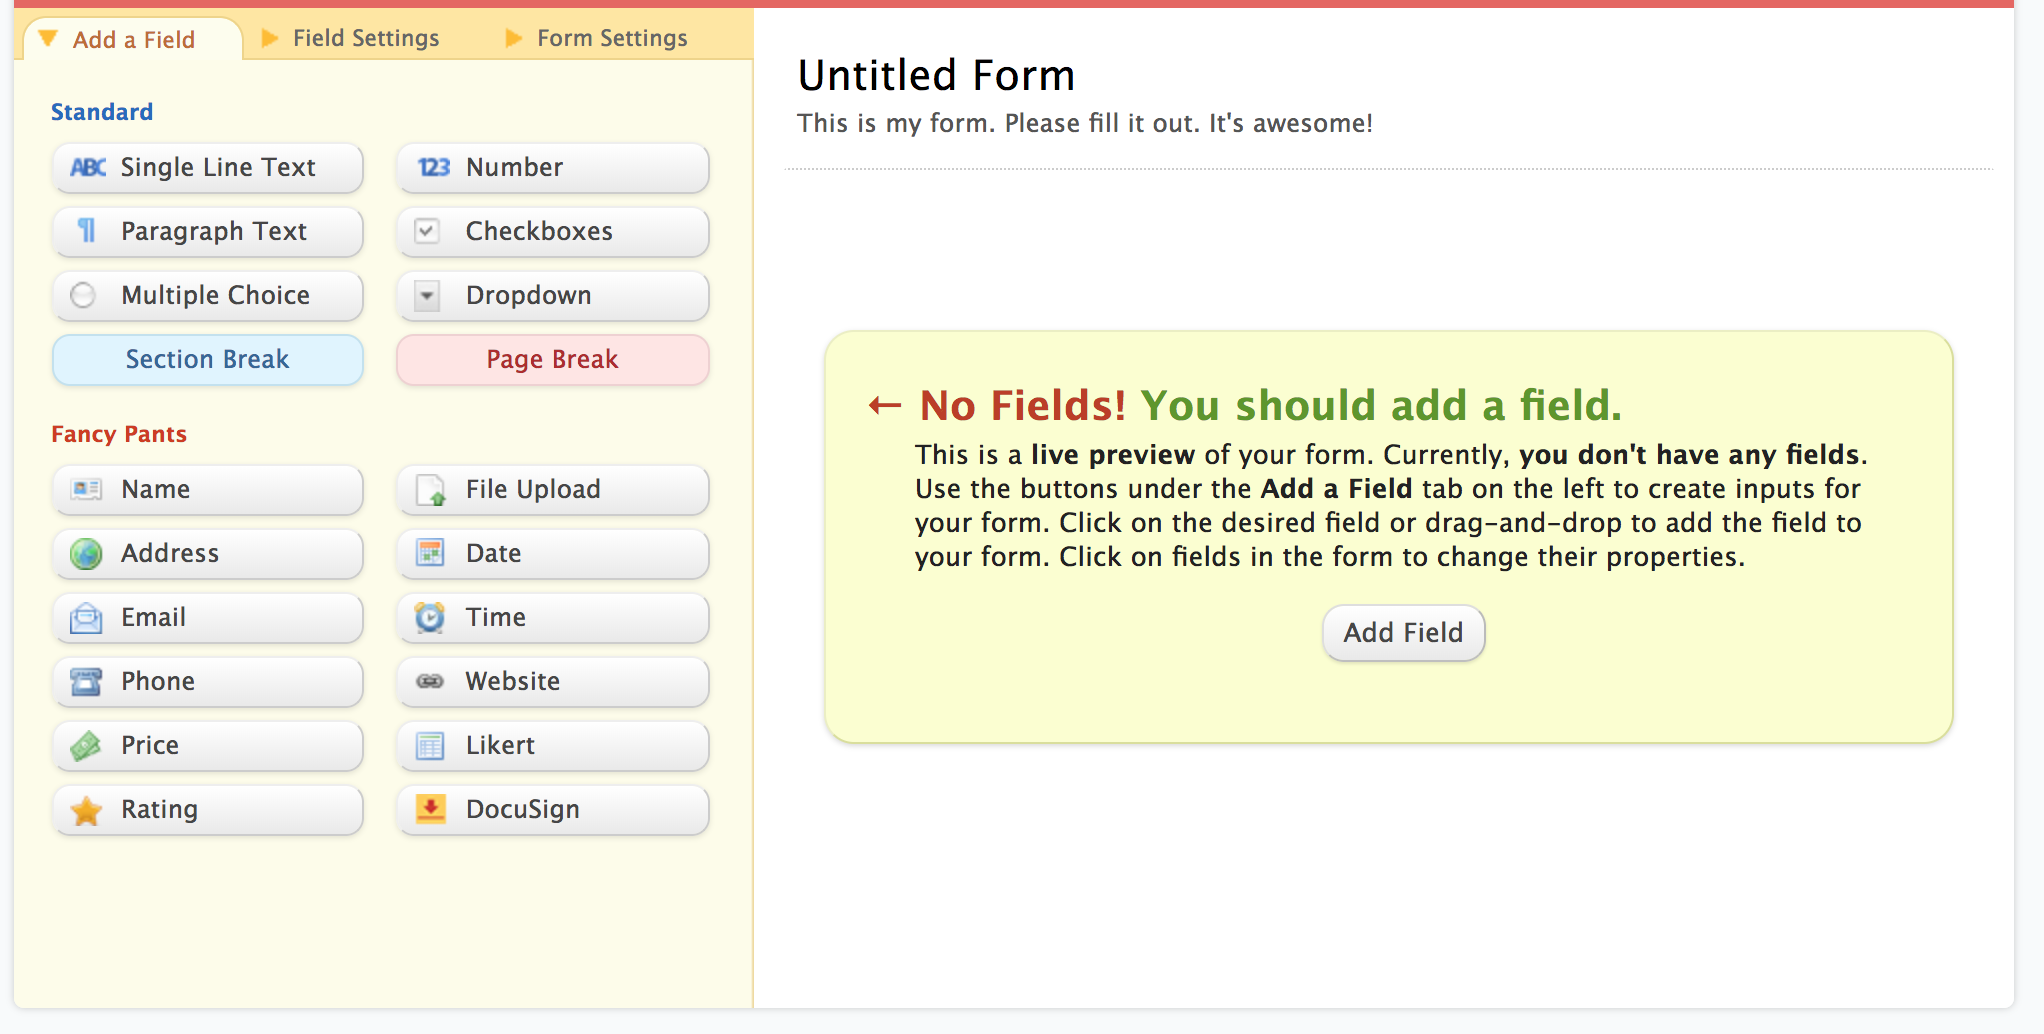
You’ll see a similar, albeit simplified, layout to Typeform’s survey designer (see below). We’ll add fields in a moment.
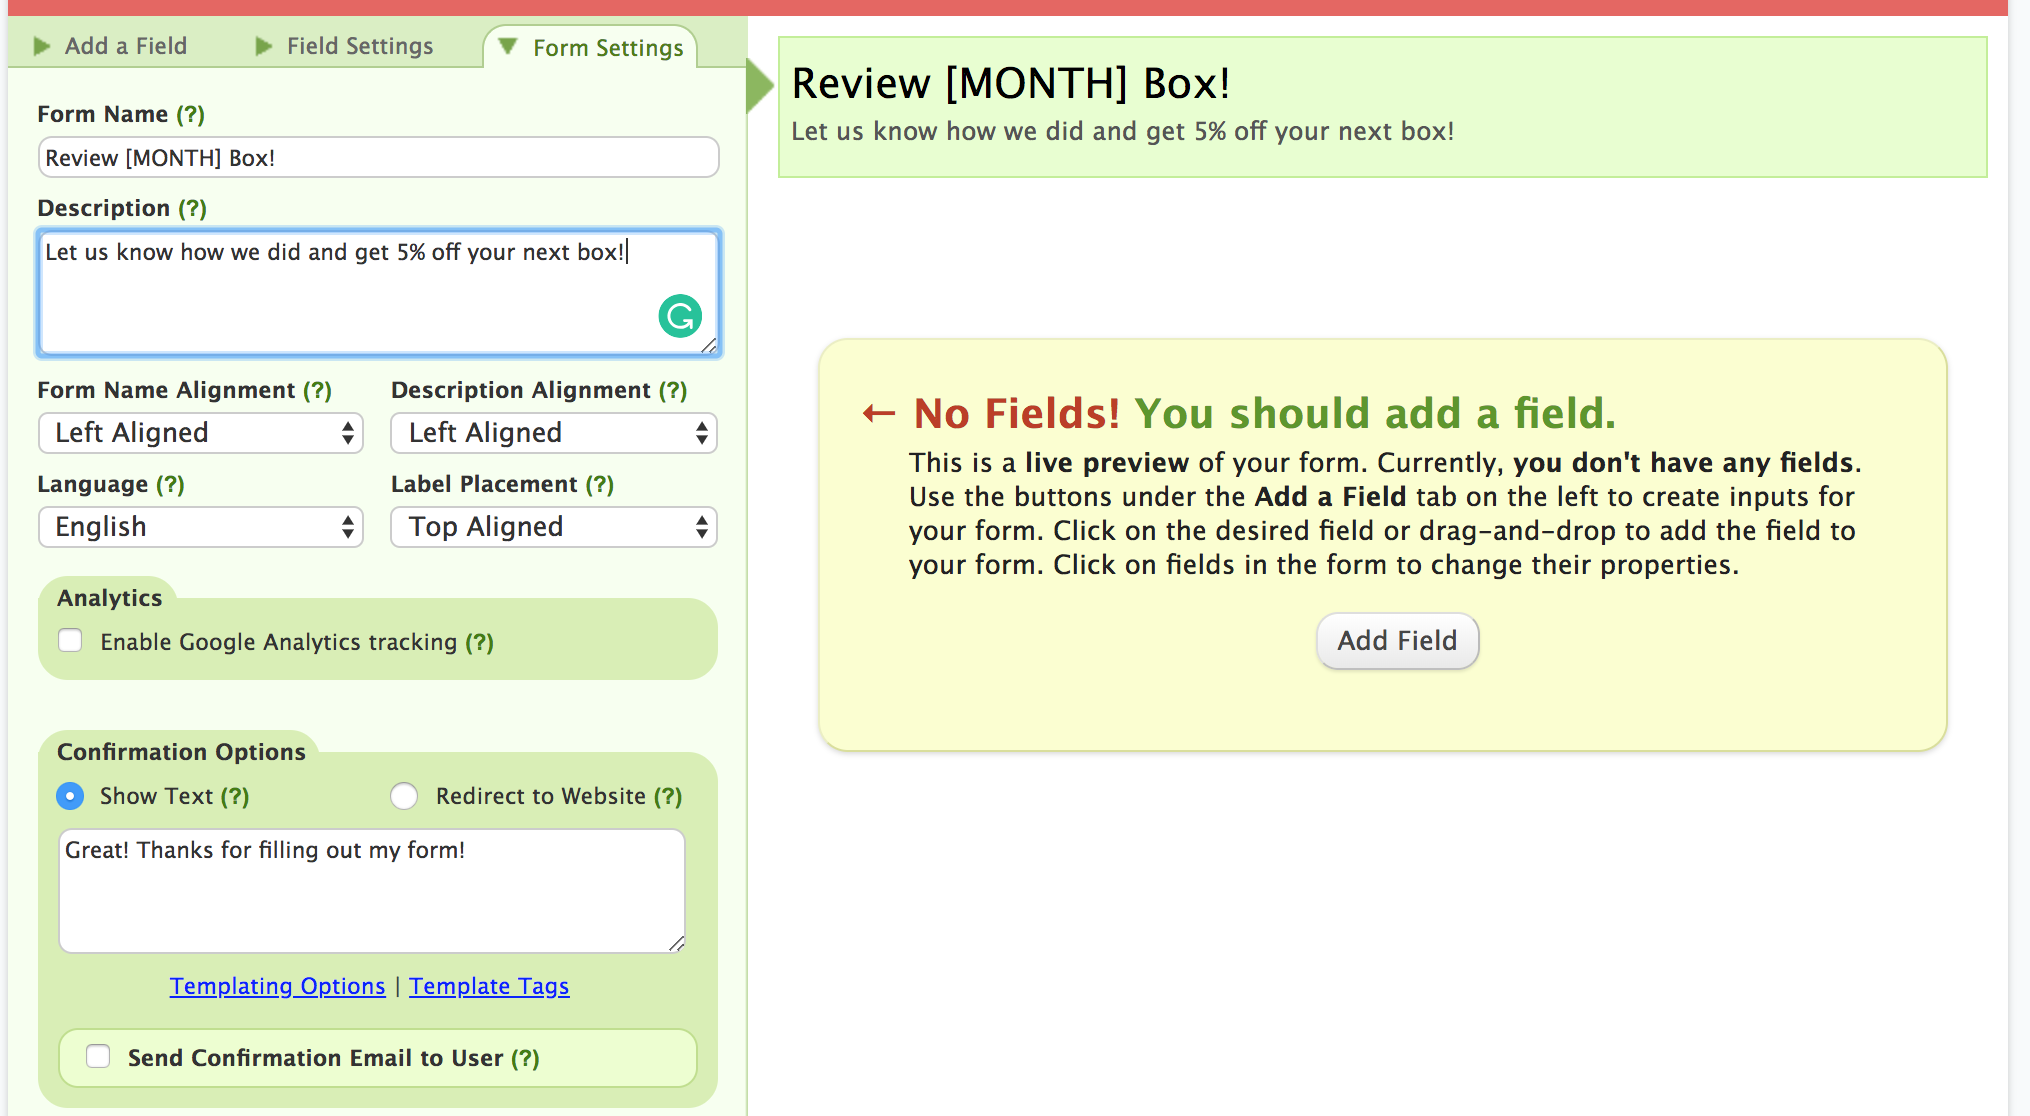
Click on the Form Name at the top to edit your survey title; this opens the green Form Settings menu in the left sidebar. Rewrite your Form Name, then edit the Description to add instructions for the subscriber or – as we do here – offer an incentive.
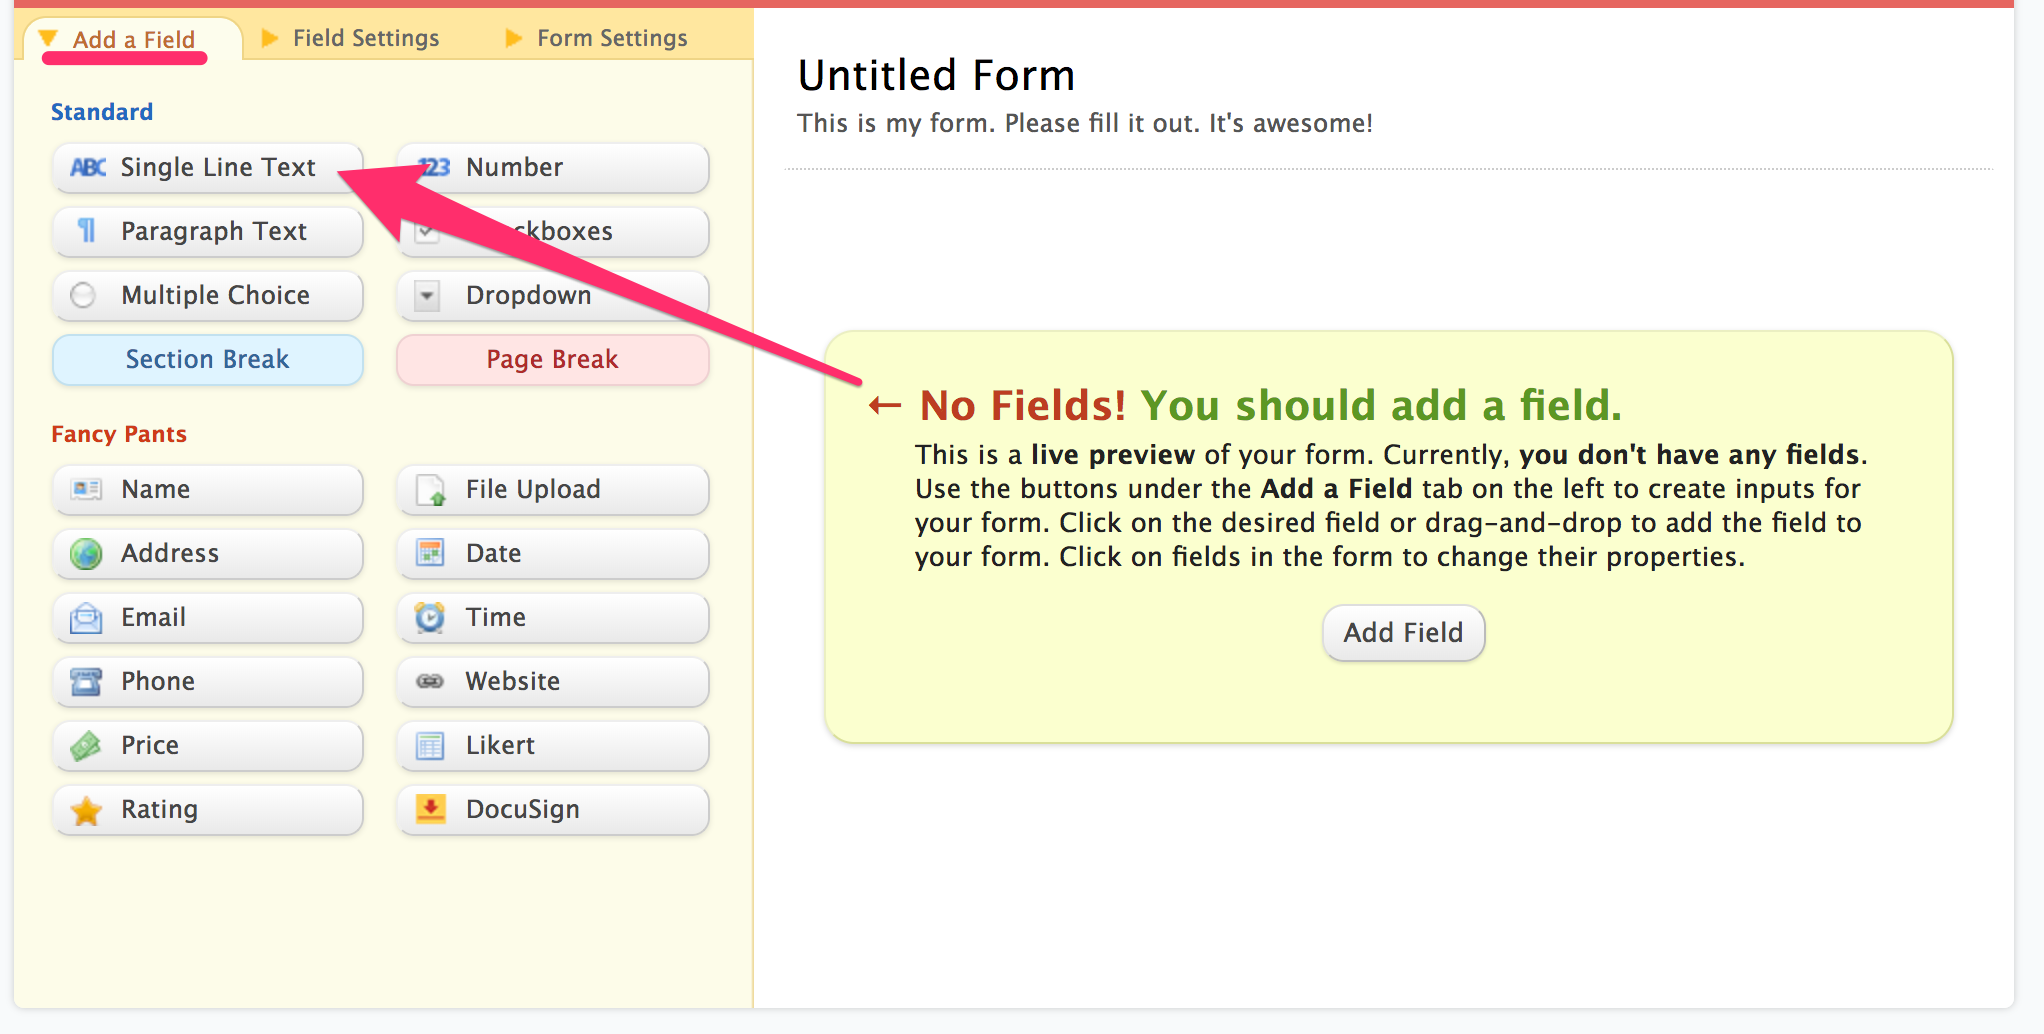
First, we want to capture the subscriber’s email address. Click on Add Field to go back to the leftmost “Add a Field” tab, then select Single Line Text. This field type allows the user to enter in one line of freeform text, but no more (for more detailed comments, you’d want to use Paragraph Text.) In Field Settings, set the Field Size to “large” (best for longer email addresses) and check off the Required option. This automatically adds a red asterisk to the end of the question, notifying the user that they can’t complete the survey without it.

Next, we’ll create a set of questions for the first product in your survey.
Click Section Break to create a dotted line, dividing the email question from the rest of your survey. Now click on the new Section Break element in the main window. Here, you’ll write in the next question prompt under Field Label. You can also write in some Instructions for User if there are guidelines you’d like your subscribers to take into account, but for our purposes today, we’re going to leave that blank.
Note: Remember to save your work frequently! To do this, click Save Form at the bottom of the page. You’ll see a popup confirming the save and asking what you’d like to do next. Select Continue editing this form to keep working.
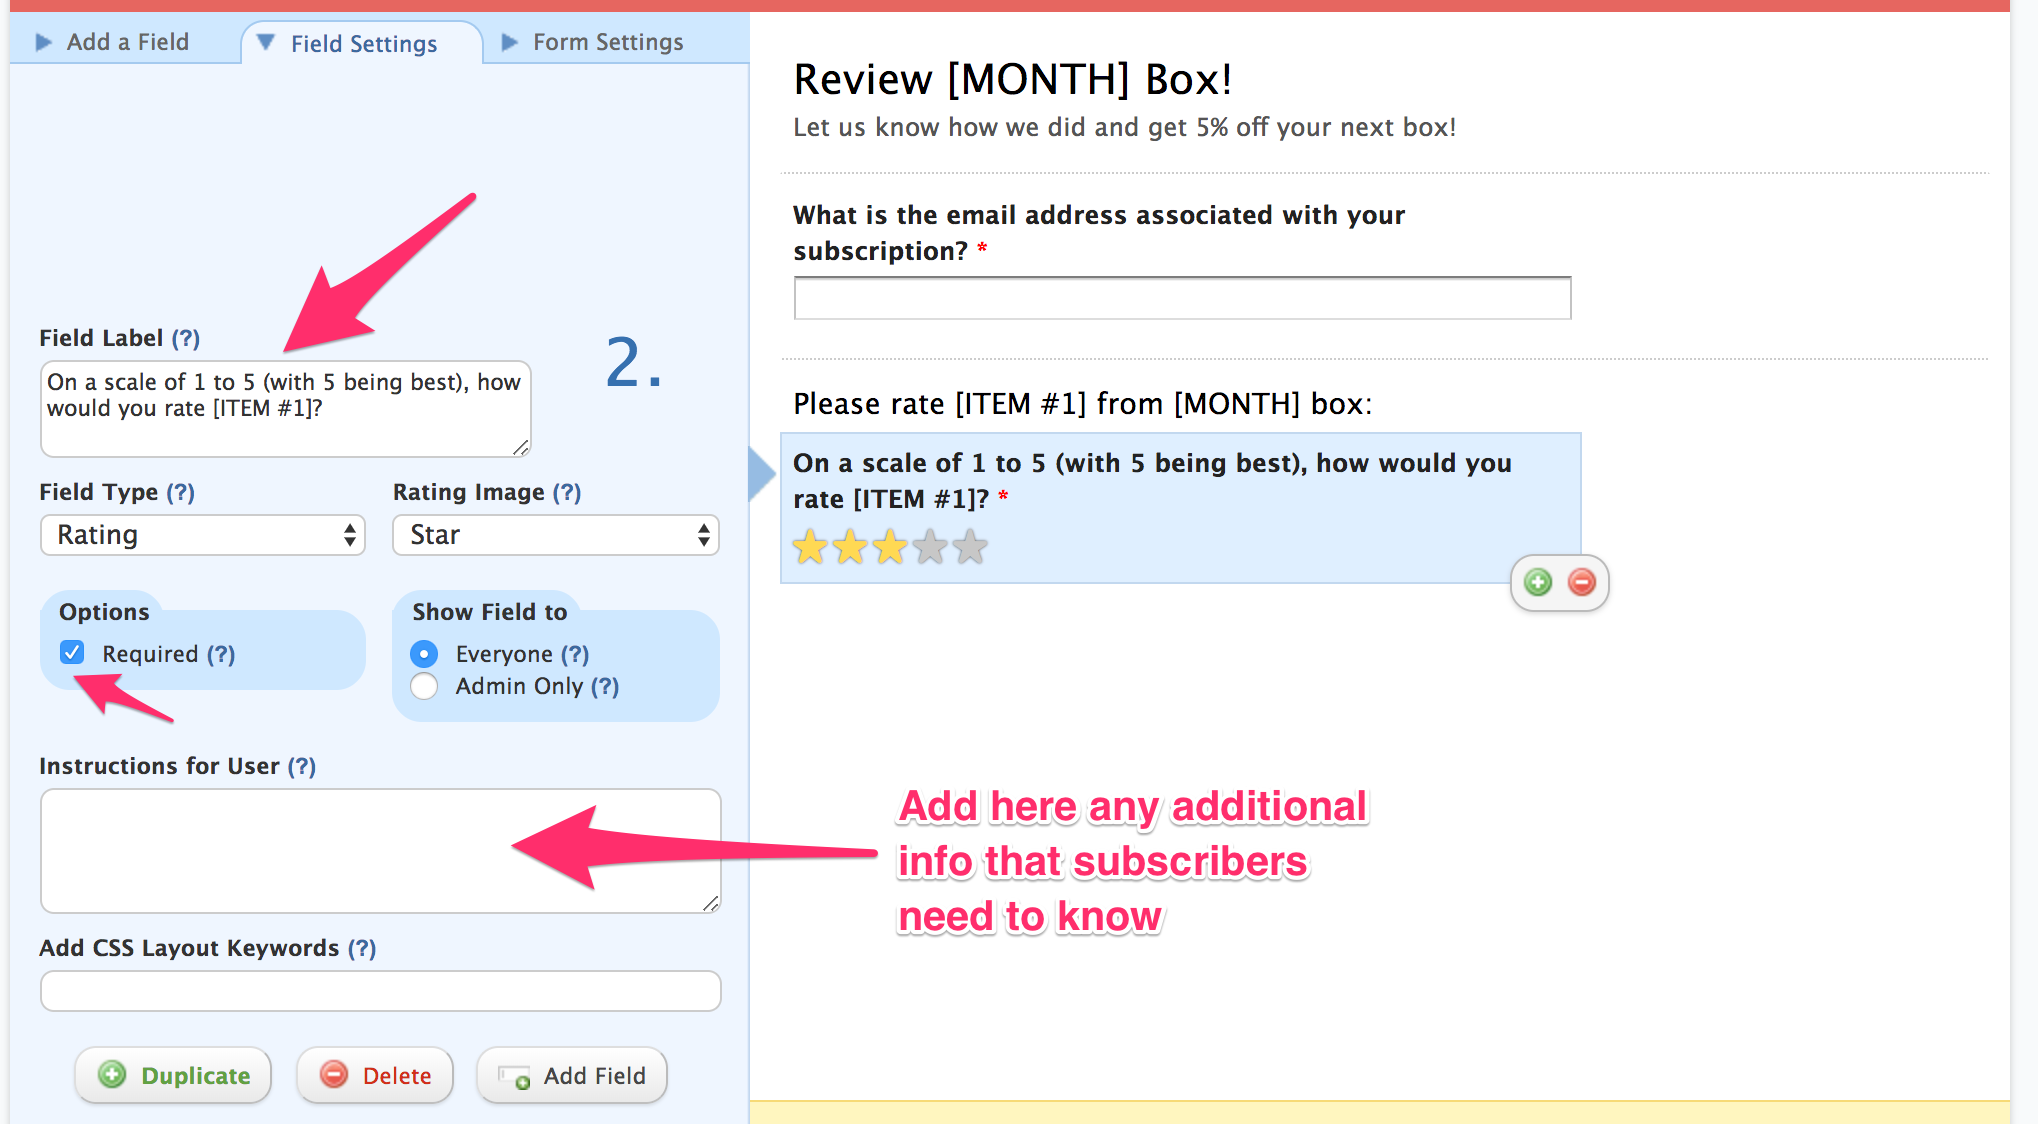
Return to “Add a Field” and select Rating. To modify the rating prompt, we’ll click on the new Rating element, then write “On a scale of 1 to 5 (with 5 being best), how would you rate [first item]?” in the Field Label box. Make sure to check off the “Required” option again, as you will for every question you want subscribers to answer.
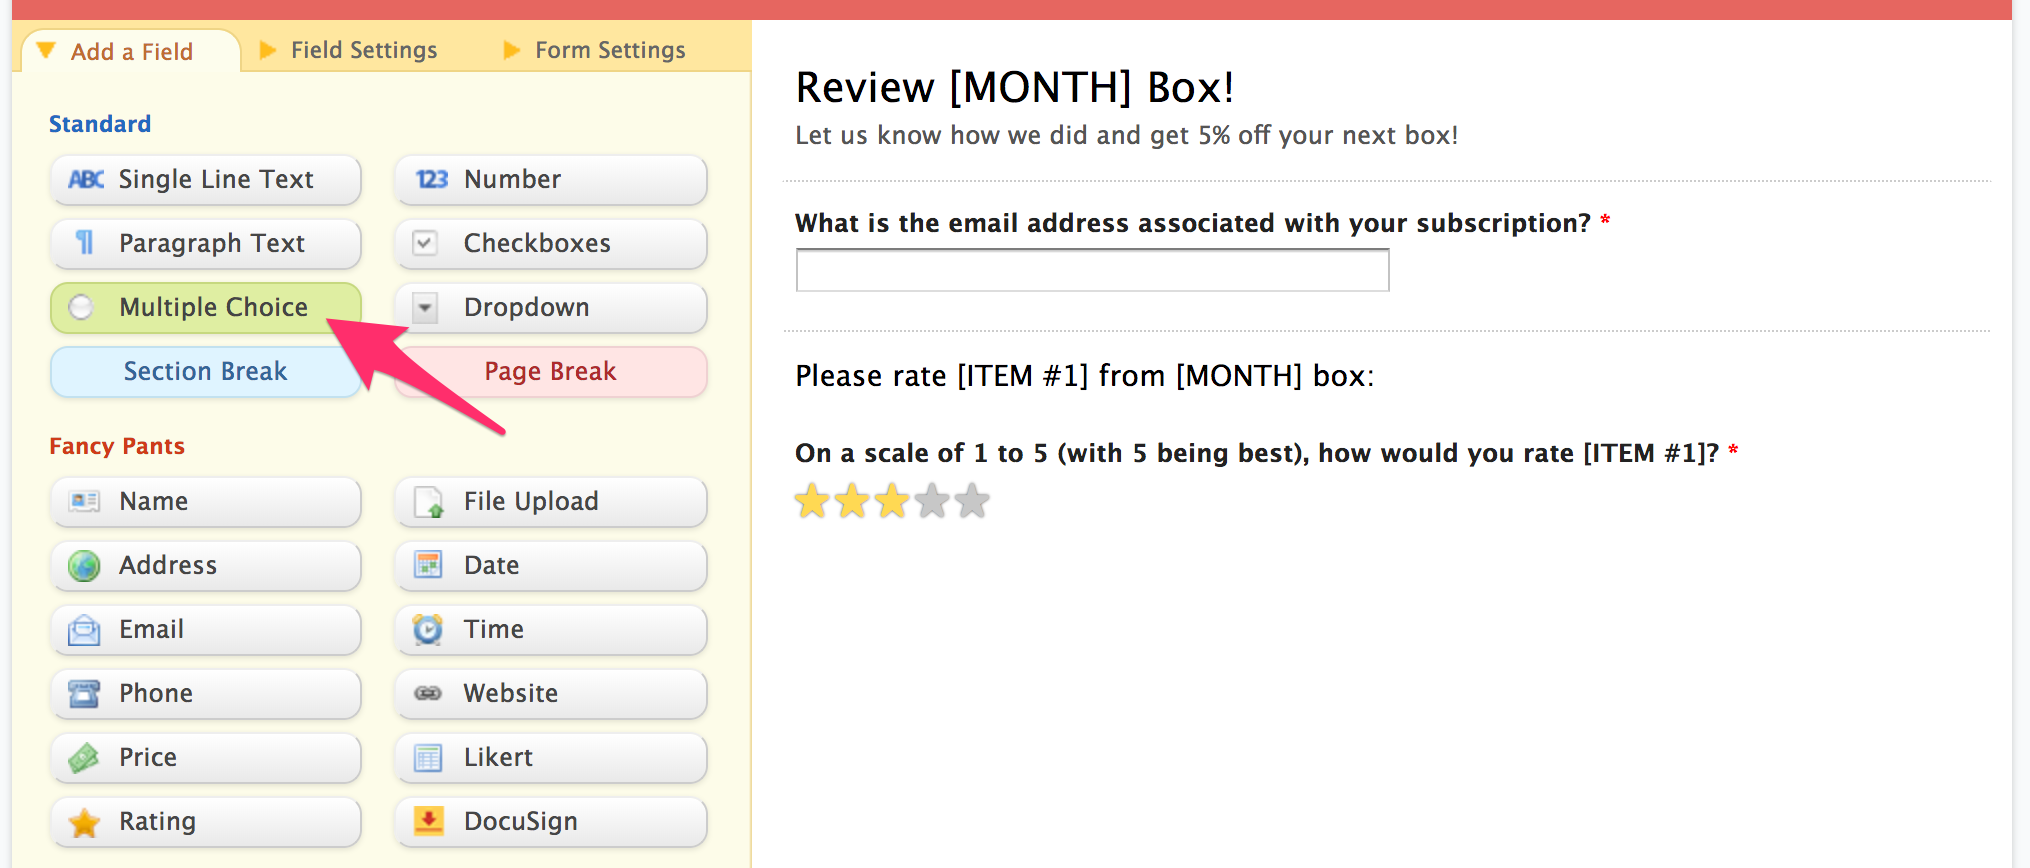
Next, we want to find out if subscribers would like similar products in the future. Since that’s a yes-or-no question, the Multiple Choice field is best for our purposes. This allows the user to select only one answer, while the Checkboxes field would allow more than one response.
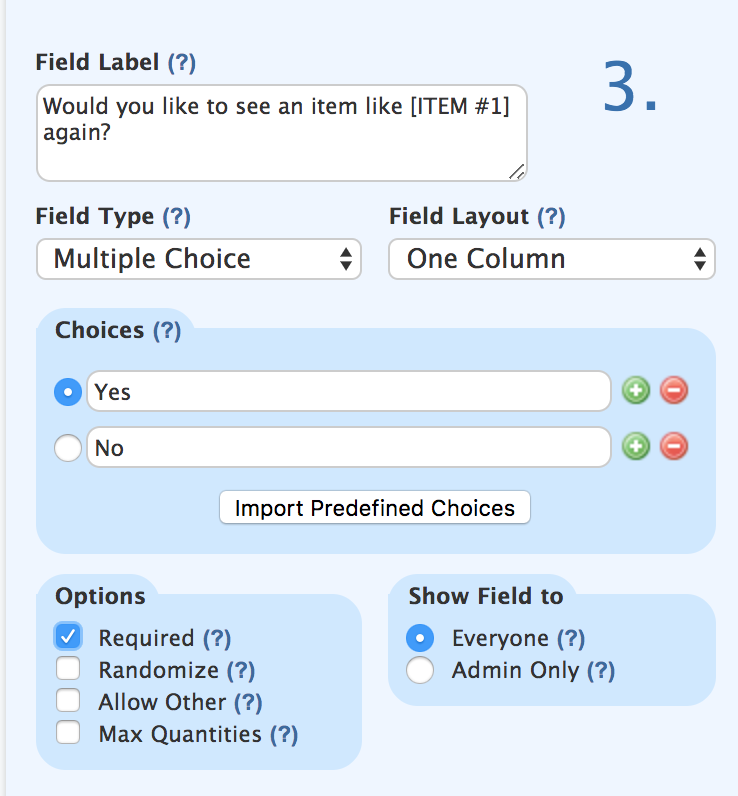
Edit the Choices to read “Yes” (first) and “No” (second), then click the red – button to delete the third option.
Finally, we’re going to add a text box for subscribers to leave additional comments on the product. Select Paragraph Text to create a new field, then update the text in the Field Label to read, “Is there anything else you’d like us to know about [name of product]?”
Since the rest of your survey consists of the same set of questions, you can duplicate these fields for each remaining product. Click on the field element you want to reproduce, then click the Duplicate button at the bottom of the left sidebar to make a copy of that field. (Alternatively, you can click the small green + icon to create a duplicate.)
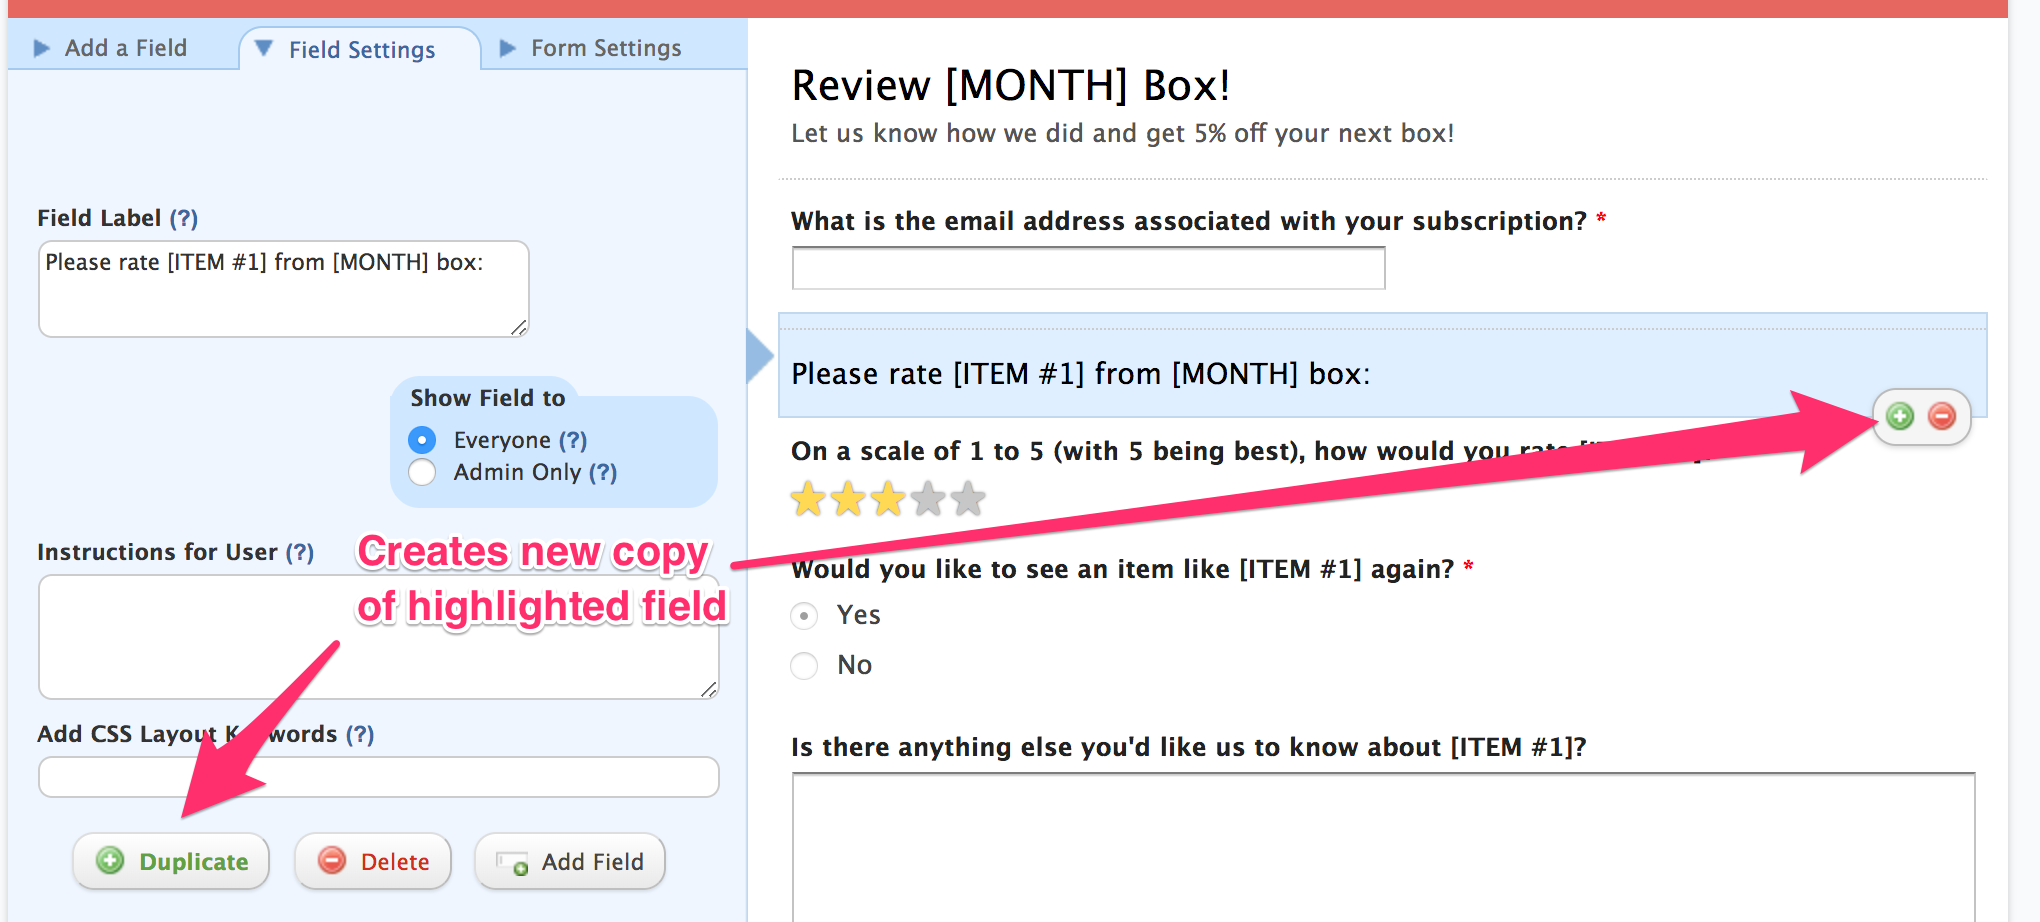
You can now click and drag that field below our Paragraph Text. Once you drag the new copy to the bottom, edit the Field Label with the next product name (i.e., “Item #2”). You’ll do this duplicate/drag/edit process for each field element.
Once you’ve done that, we’ll need to add a couple more questions for an overall review of that month’s box. You want to set these up with the same order as the prior sets of questions: Section Break, then Rating, then Paragraph Text. (No Multiple Choice prompt this time.)
Check out the holistic review section below:
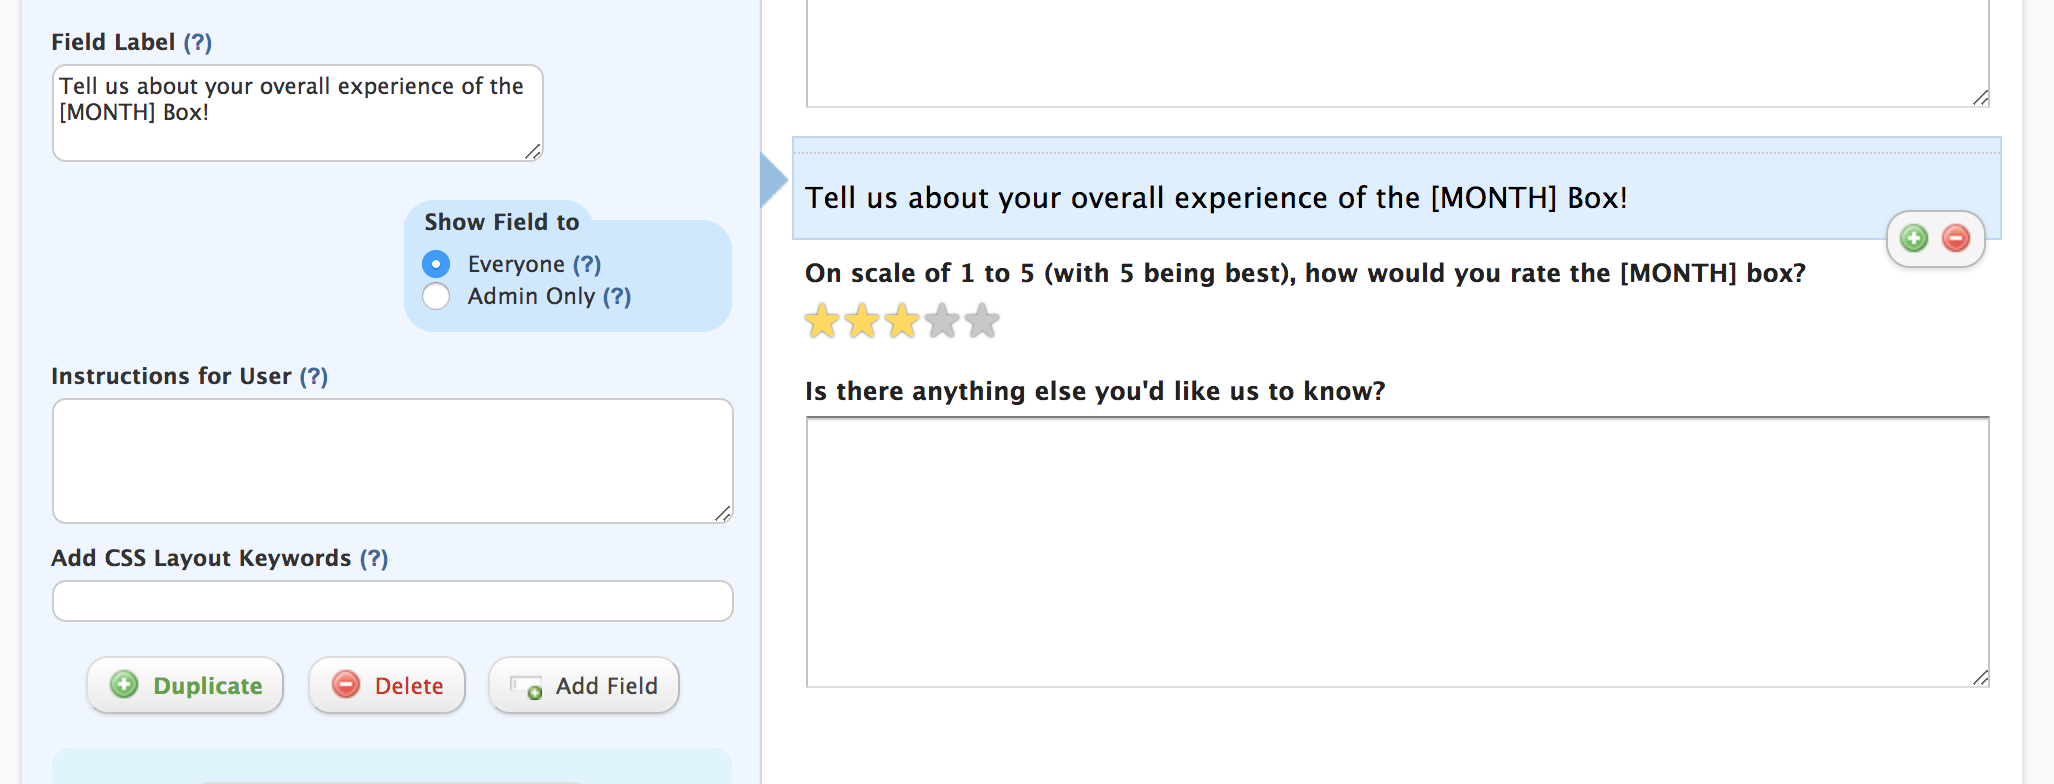
Save your work, then select “Continue editing this form” in the post-save popup. We recommend previewing your survey by clicking View Form before you share the survey with your email list! Make sure the survey looks just the way you want and proofread it for any typos.
Congratulations – you’ve made your first Wufoo survey! Now you’ve got plenty of options for gathering subscriber feedback.
Making Your Results Actionable
Whether you use Typeform, Wufoo, or some other survey tool, use the recommended questions and add your own to make your feedback as actionable as possible. If the feedback doesn’t help you make constructive improvements for your box or business operations, it’s not as useful as it could be. Aim for practical suggestions as you develop your survey. You’ve got this!
Questions, comments, or suggestions?
Leave us some feedback in the comment section below!


